How to Make Vinyl Record Artwork. A Step by Step Guide
With vinyl records getting very popular more and more people struggle to make vinyl artwork that is print ready. That’s why I created this article to help you out with the process of creating vinyl record artwork without spending too much time thinking if it’s correct.
To make vinyl record artwork follow these steps:
- Open Photoshop and template
- Import your artwork panels
- Resize the panels to fit the template
- Check the bleed and positioning
- Disable the template
- Export as .pdf
This is just the step by step sequence that you should follow to get your artwork ready. Let me explain each step in detail.
1) Open Photoshop and Vinyl Artwork Template
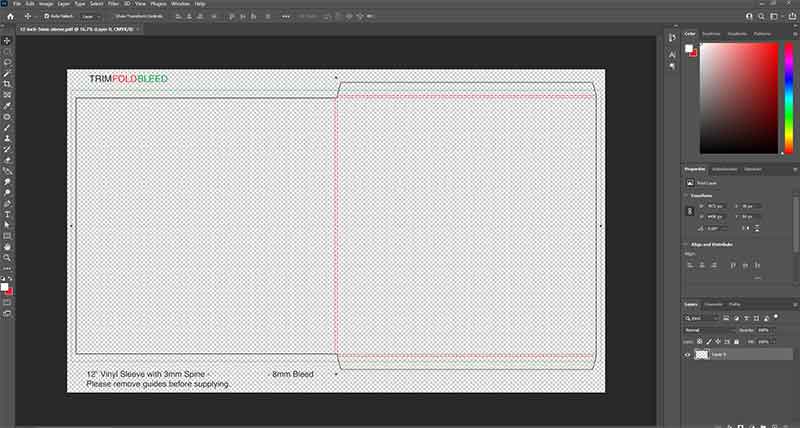
First open up your Photoshop software and the template that you can download from our templates page. Do this by clicking on File then Open.
If you don’t have a Photoshop I suggest to use a free software Pixlr X
Once you load up the template, on the right hand side, you can see the layers section. This is where you’ll layer each of the panels of your artwork on top of each other. Make sure you keep our template on the top of the layer list.
If you can’t see the layers section go to Window then Workplace and select Photography. This should enable the layers section on the right hand side.
Template guide explanation
Bleed (green line) – the extra background space that has to be covered by your artwork.
Fold (red line) – this is a printable area but we recommend not to put any important information there like text of logos.
Trim (black line) – cut line sits in the middle of bleed and safety margin. This is where we cut and fold the sleeve.
2) Import Your Vinyl Record Artwork Panels
Your vinyl artwork should consist of two panels: front and back.
Let’s start with the front panel
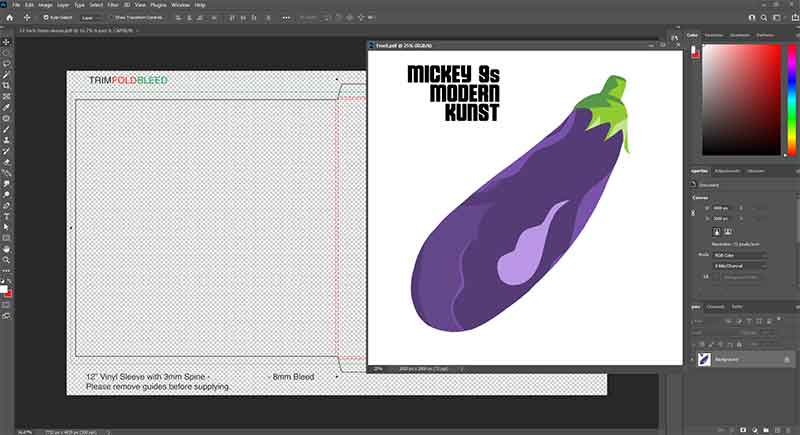
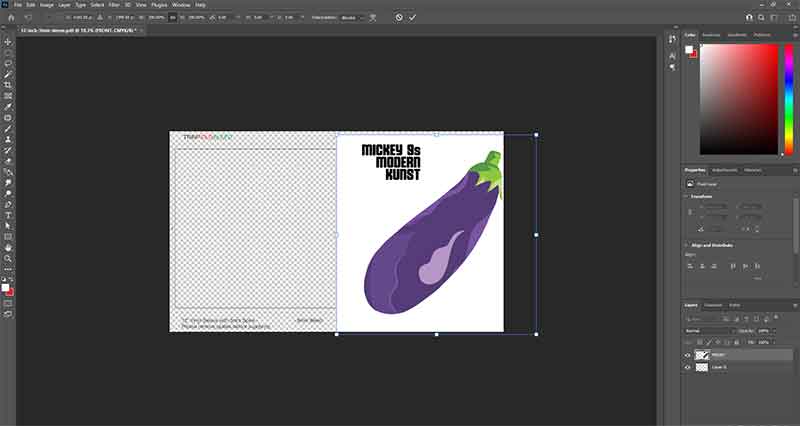
You’ll notice that the front panel opens up as a separate Photoshop file, on a separate tab. You want to change the view so you can copy the image on to the template file.
To do this, click on the tab for your front panel image (this will have the file’s name on it) and drag down until you see both files in the same window.
Now by clicking on your artwork panel move it to the template tab and drop it (anywhere where the template is).
Your artwork panel should be much bigger than the template size. That’s good. It’s means it’s in high definition and the will look good once printed.
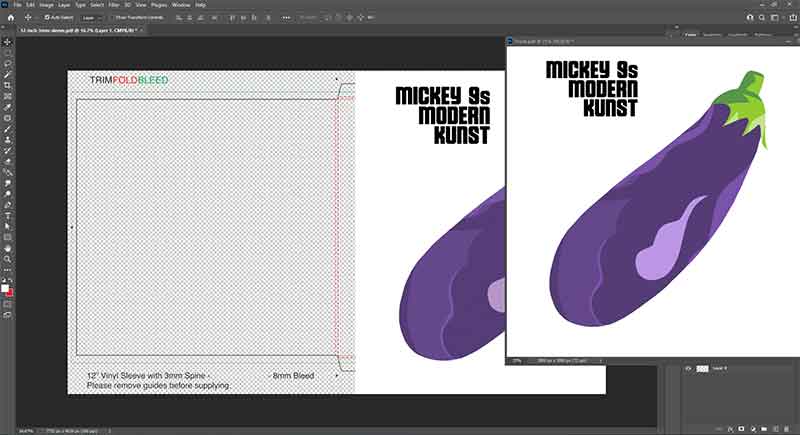
You can now close the artwork tab.
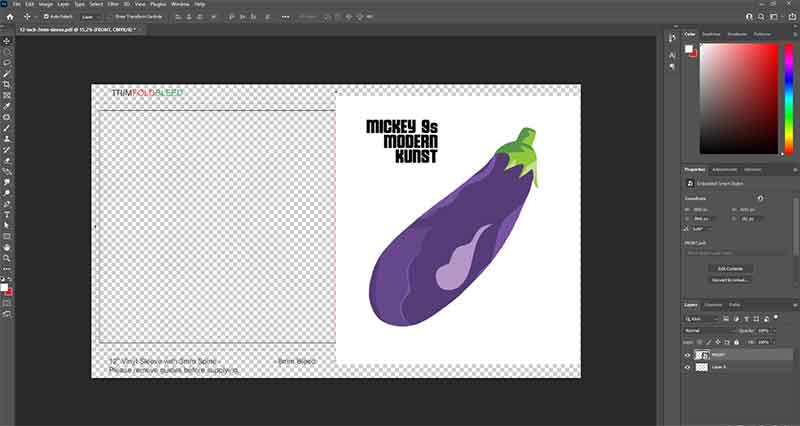
On the right hand side in your layer section you can now see another layer. That’s the front panel image. To make things easier for yourself double click on the “layer 1” name and rename it “front”.
As you can see the layer is highlighted in the layers section. This means we will operate only on this layer and no other layer will be affected.
Get ready for your CD release!
Download our FREE pdf guide and be on the sure path to release your CD successfully.
Download pdf guide3) Resize the Panels to Fit the Template
Now it’s a time to resize the artwork layer and fit it to the template.
With the artwork layer highlighted (right hand side) on your keyboard press “Ctrl” and “t”. This will show you the whole panel even if it’s outside the template zone. With the bigger files you might have to zoom out (“Ctrl” and ” – “) to see the whole view.
Press and hold shift key (arrow above “Ctrl”) to make sure resizing will be proportional and make your artwork smaller.
When resizing any element always keep holding the shift key to make sure you don’t change the structure of the panel.
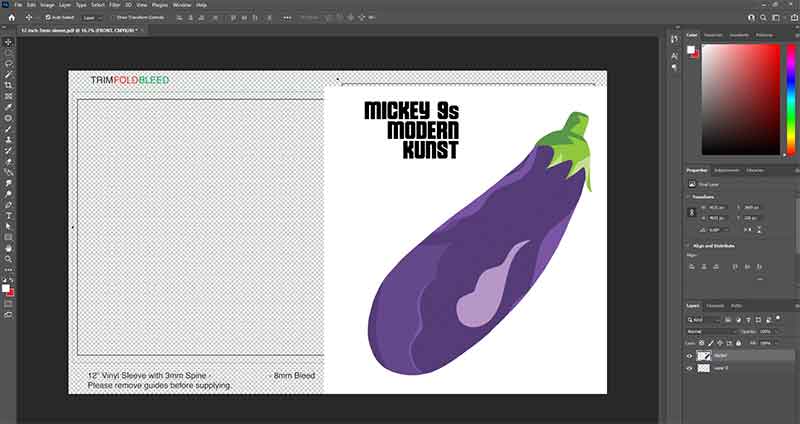
Now try to fit the panel into the right hand panel (front).
Depending on how well your artwork is designed you might have to stretch it either to the left or right.
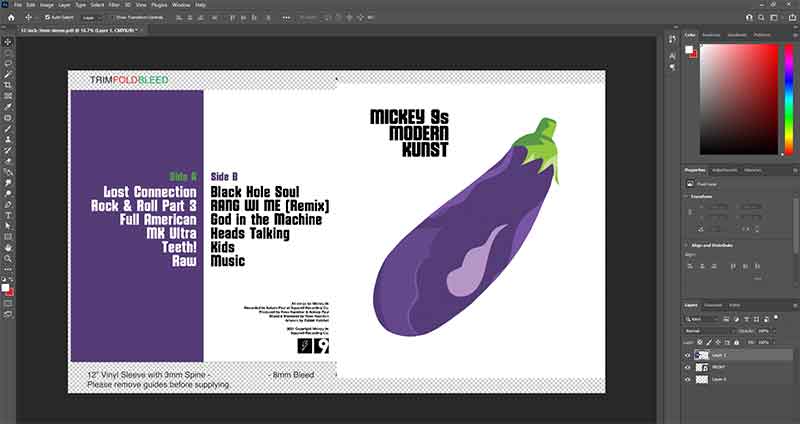
Remember, artwork panel should cover the bleed lines. The red lines indicate the bleed and fold area. It is essential that your artwork covers the bleed lines but also that none of the important elements of your graphics such as text or logo are beyond the bleed line and the safety margin.
Now repeat the exact same process for the back cover.
4) Check the Bleed and Positioning
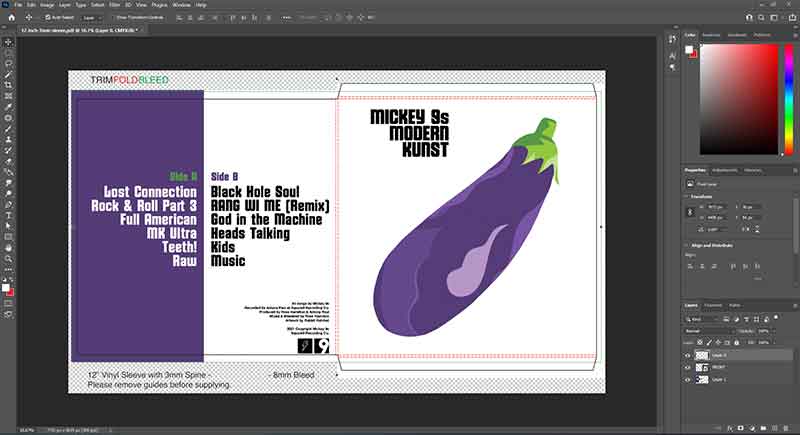
Make sure all the panels are covering the red bleed lines. To do that move the template layer from the layers panel to the very top. This will show you exactly if any of the elements are too close to the edge or the artwork doesn’t cover the bleed lines.
This is how it should like with the template on.
5) Disable the Vinyl Artwork Template
Move the “Front” and “Back” layers to the very top and disable the template by clicking on the “eye” icon in the layers panels section.
During the process of fitting the artwork panels to the template you’ll probably switch between template on and off options pretty often.
6) Export as .pdf
Now with the template disabled you can export the whole artwork to .pdf file.
Before you do that make sure your artwork is in CMYK mode (printing mode). To do that go to Image (3rd column from the left, next to File and Edit) and Mode and select CMYK. Make sure you’re happy with the colours as CMYK mode will not display very prominent colours.
Now let’s export the artwork.
To do that go to File, Save As and in the Format drop down menu select Photoshop PDF and click Save.
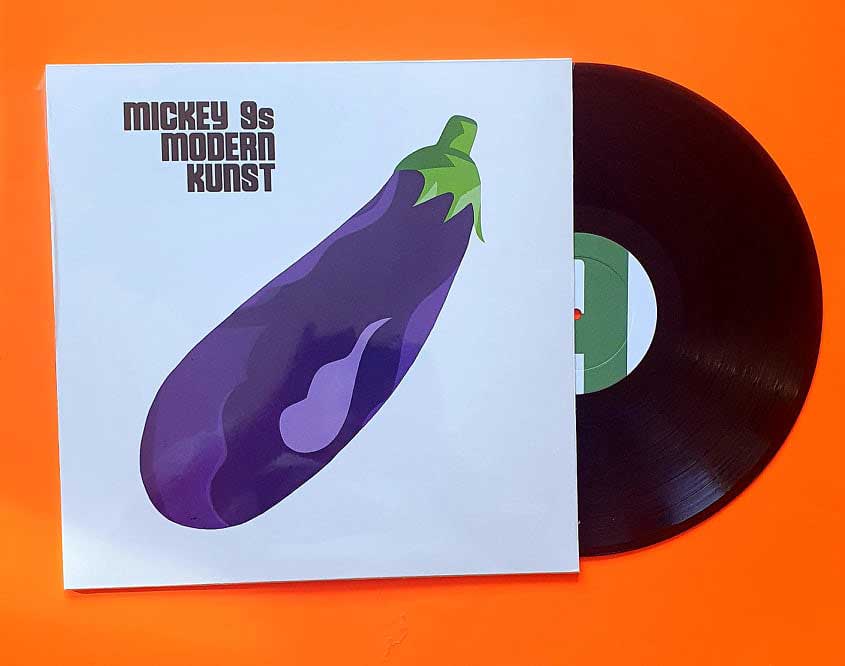
This is How This VInyl Artwork Will Look Printed


How to add text on the spine
If you’ve decided to go for sleeve with a spine you’d like to add text to your spine.
To do that select “type tool” and zoom in to the spine section and type the text you want to add.
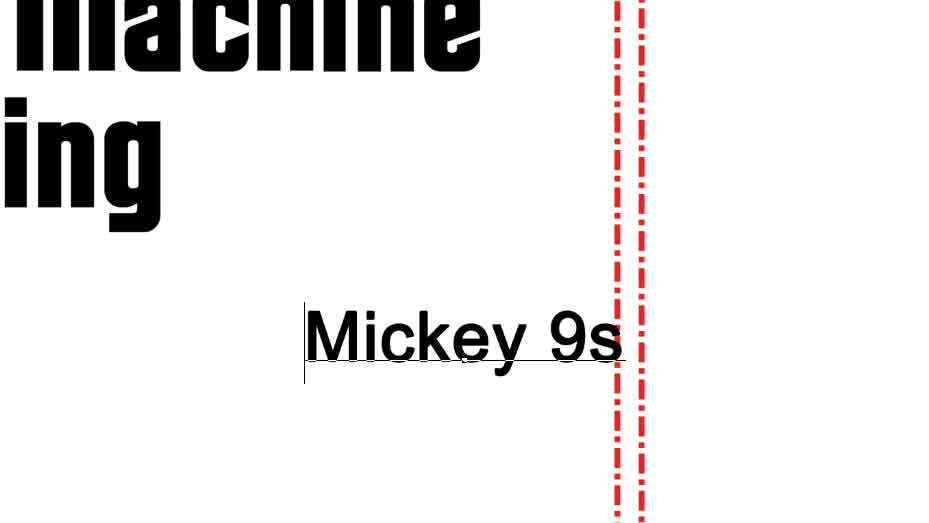
Then, select “move” (very first tool on the left hand side) and rotate the text to vertical position.
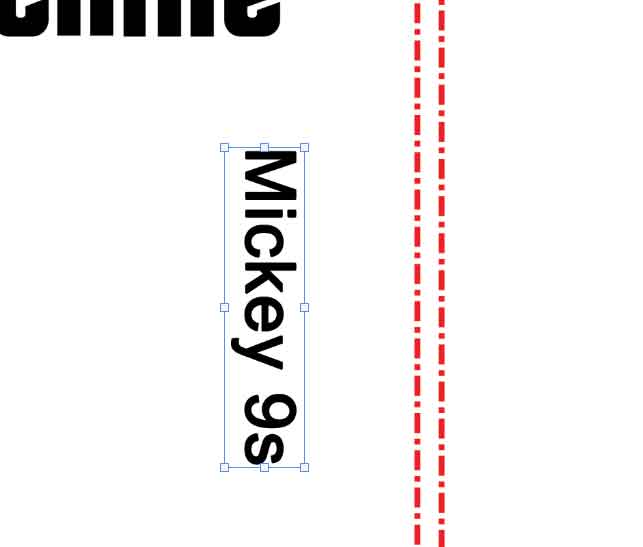
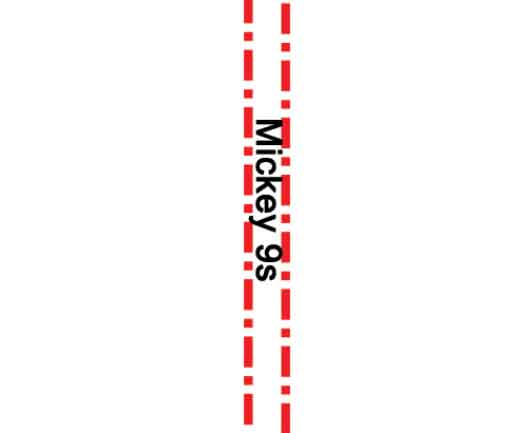
Now, move the text to the spine area and resize the font to make sure it fits between the two red lines.
How to Know if My Artwork is in High Resolution?
You can check if the artwork is in high resolution by going to Image and Image Size in the top menu. You will see there Resolution tab. The artwork should be in at least 300 pixel/inch.
If the artwork is below 300 dpi, once printed, it might come out blurry and with visible pixels.
I only have my artwork in a .jpeg format. Is that okay?
It is not ideal to have your artwork in the jpeg file. This is lossy file which means it is compressed and some of the attributes of the original file are lost during the compression to jpeg format.
If you can’t avoid it, use it but make sure it’s the highest size possible to minimise the potential pixelasation.
I Don't Have Photoshop on My Computer. Is There an Alternative?
Photoshop is definitely the best and easiest software to use when prepping artwork. Some artists use Canva.com but it’s not ideal and the resizing might be problematic.
Do I Have to Use Your Templates? Are All the Templates the Same?
If you’re planning to press vinyl with us than yes, use our templates.
Most of the templates are generally the same so if you have your artwork ready according to another vinyl artwork template get in touch with us and we’ll make sure it fits okay to our templates.
I Have No Idea What I'm Doing. Can You Help?
Of course we can help! That’s why we’re here. 🙂
Send us message via our contact page and we’ll help you out.
Hope that helps!
Thanks,
Tom
Get ready for your CD release!
Download our FREE pdf guide and be on the sure path to release your CD successfully.
Download pdf guideRelated articles
Hey, I’m Tom, and I’ve been involved in the music industry for over two decades now! I help bands produce top-notch records by lending my expertise in CD manufacturing, music business and mastering. But that’s not all – I also have a soft spot for writing and sharing knowledge with others. I hope you’ll find the content I create enjoyable to read and that it provides some valuable insights into the world of music.

